
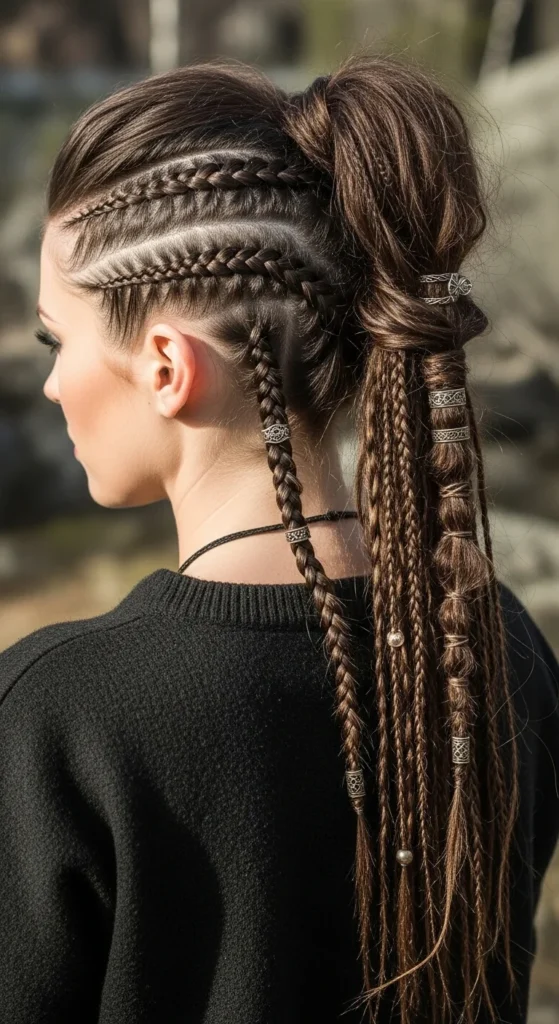
Bold, powerful, and effortlessly cool, the Viking ponytail hairstyle has become one of the most popular warrior-inspired looks online. From fantasy shows to Pinterest boards, this hairstyle blends tight braids with a dramatic ponytail to create a fierce yet beautiful vibe.
The best part is that you do not need to be a professional stylist to pull it off. With a few simple braiding techniques, a bit of texture, and the right placement, you can create a shieldmaiden-worthy ponytail right at home.
Whether you are heading to a festival, cosplay event, or gym session, or simply want a bold everyday hairstyle, this guide will show you exactly how to create a Viking ponytail step by step.
What Makes a Viking Ponytail Unique?
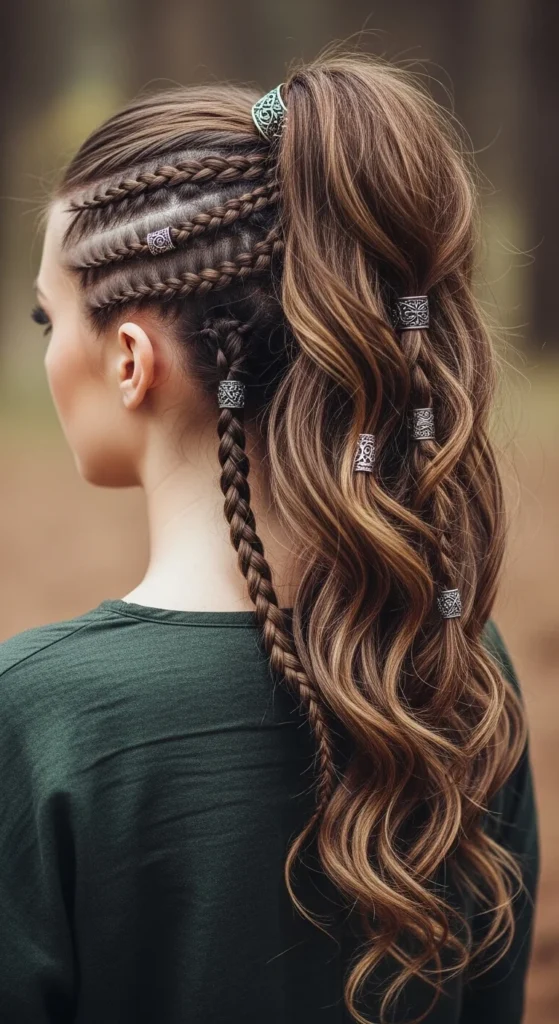
A Viking ponytail is not just a regular ponytail. The signature look comes from combining structured braids with a textured ponytail.
Most Viking ponytails include the following elements.
• Dutch braids or lace braids along the scalp
• A mid to high ponytail near the crown
• Accent braids inside the ponytail
• Lots of volume and texture
• Accessories like metal cuffs, beads, or leather wraps
Many modern styles are inspired by warrior looks seen in fantasy series and shieldmaiden characters. However, most versions you see online are modern interpretations rather than historical recreations.
The key idea is simple. Braids create structure, and the ponytail adds drama.
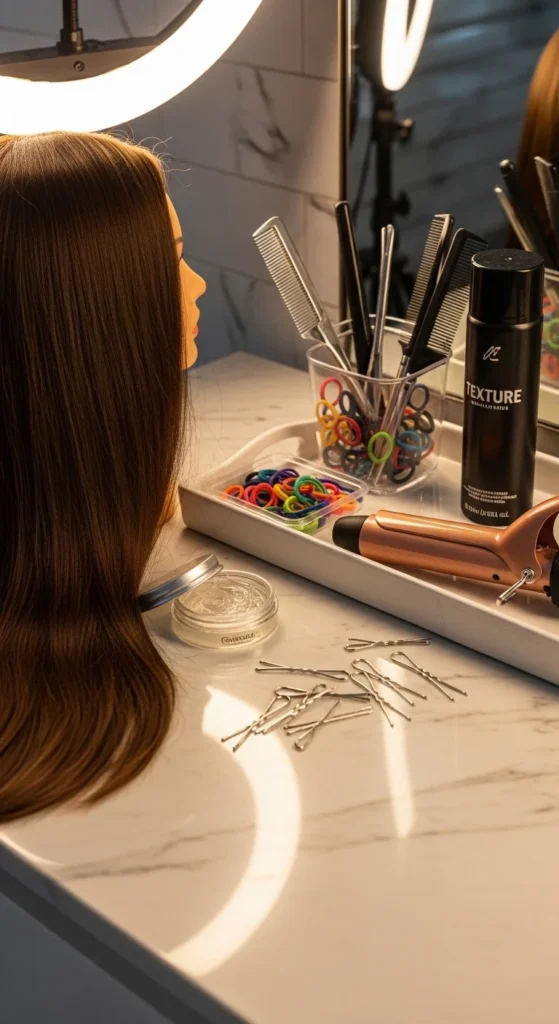
Tools and Products You Will Need
Before starting your Viking ponytail, gather a few essentials. These tools make the process much easier.
Basic tools
• Hairbrush or wide comb
• Small, clear hair elastics
• Strong ponytail elastic
• Hairpins
Helpful styling products
• Texture spray for grip
• Dry shampoo for volume
• Strong-hold hairspray
These products help prevent braids from slipping and make the hairstyle last longer.
Step 1: Add Texture and Volume
Viking hairstyles rarely look sleek or flat. The goal is rugged volume and texture.
Start by brushing your hair and applying texture spray or dry shampoo at the roots. If your hair is very smooth or fine, lightly tease the crown area to create lift.
Tips for better volume
• Slightly messy hair works better than freshly washed hair
• Backcomb gently near the crown
• Use a texturizing tool if your hair feels too silky
This step creates the full warrior-like structure that Viking ponytails are known for.
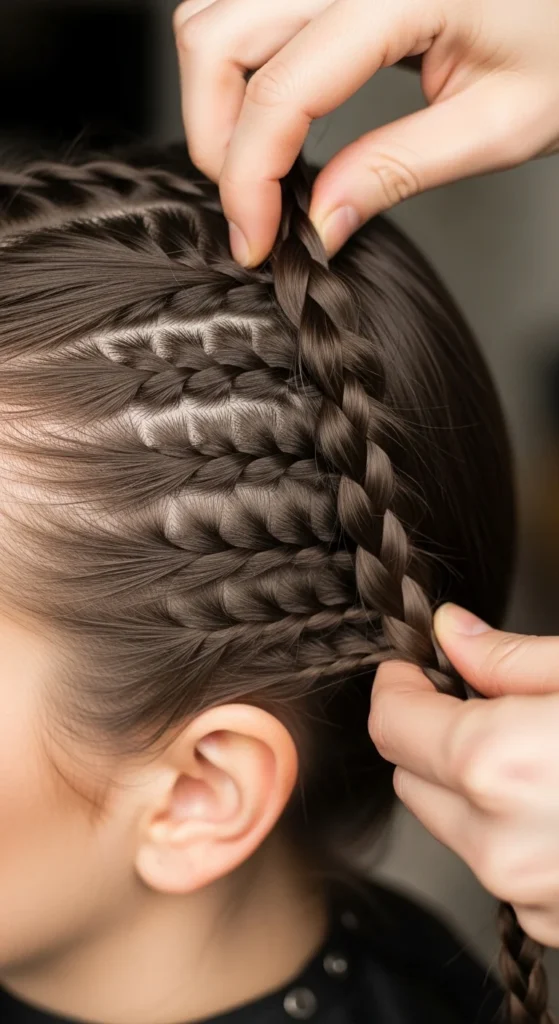
Step 2: Create the Side Dutch Braids
Dutch braids are the most common technique used in Viking ponytails. They are sometimes called inside-out French braids.
Here is how to create them.
- Part your hair down the middle or slightly off-center.
- Take a small section near the temple.
- Start a Dutch braid by crossing strands under instead of over.
- Continue braiding toward the back of the head.
- Secure with a small elastic.
Repeat the same process on the other side.
These side braids create the signature Viking structure framing the head.
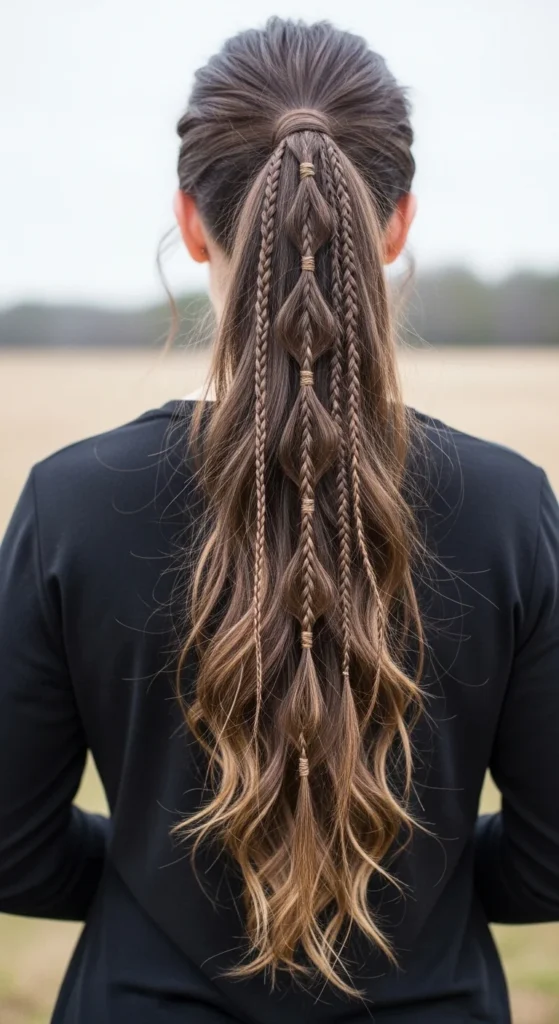
Step 3: Gather Hair Into the Viking Ponytail
Once the side braids are finished, gather all your hair together.
The ponytail should sit at or slightly below the crown of the head. Placement matters. If it is too high, it looks sporty. If it is too low, it loses the Viking effect.
Secure everything with a strong elastic.
For a cleaner finish
• Wrap a small piece of hair around the elastic
• Pin it underneath to hide the band
This instantly gives your ponytail a more polished and powerful look.
Step 4: Add Accent Braids for Detail
One feature that makes Viking ponytails stand out is microbraids or accent braids.
Take small sections from the ponytail and create
• Mini three-strand braids
• Rope braids
• Small fishtail braids
These tiny braids add texture and make the hairstyle look more complex and battle-ready.
You can create as many or as few accent braids as you like.
Step 5: Pancake the Braids for Thickness
“Pancaking” is a simple trick that makes braids look wider and fuller.
To do this
• Gently pull the edges of each braid outward
• Work slowly from top to bottom
• Stop when the braid looks thicker and softer
This technique is especially helpful if you have thin or fine hair, because it creates the illusion of more volume.
Many Viking hairstyle tutorials rely heavily on this trick.
Step 6: Style the Ponytail Ends
The final step is styling the length of the ponytail.
You can keep it natural or add texture with loose waves. Curled ends often create a beautiful contrast between the tight braids at the scalp and the soft ponytail below.
Popular finishing touches include
• Loose waves with a curling wand
• Texture spray for a messy effect
• Decorative hair cuffs or rings
Quick Tips for a Perfect Viking Ponytail
If you are trying this hairstyle for the first time, these tips will help.
• Practice Dutch braids first because they are the foundation of most Viking styles
• Use texture spray to prevent braids from slipping
• Do not place the ponytail too high
• Add small braids for extra detail
• Use accessories like metal rings or cuffs for a stronger Viking vibe
Some advanced versions mix multiple braid types like lace braids, rope braids, or even mohawk braids, but beginners can start simple and build from there.
Final Thoughts
The Viking ponytail hairstyle is the perfect mix of strength, style, and creativity. With just a few braids and a well-placed ponytail, you can transform your everyday hair into something that looks bold and adventurous.
Once you master the basics, you can experiment with different braids, accessories, and textures to create your own shieldmaiden-inspired look.
Save this guide so you can recreate the Viking ponytail anytime you want a fierce new look.

Leave a Reply